What Most People Think Mold Remediation Is
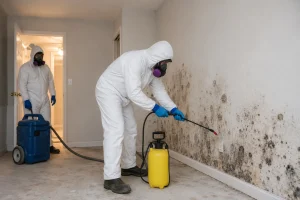
Most homeowners imagine mold remediation as someone in a mask spraying a wall with something, wiping it down, and leaving. Maybe with a machine running in the corner.
That picture could not be further from reality.
Real mold remediation — done properly by a licensed, IICRC Building Sciences certified professional — is a multi-step, carefully sequenced process that involves containment engineering, air pressure management, material removal, structural treatment, multi-stage cleaning, and documented post-assessment. It is as much about protecting the rest of your home during the process as it is about removing the mold itself.
As a licensed mold remediation contractor and IICRC certified professional serving New York City and the surrounding boroughs, I want to walk you through exactly what a proper mold remediation includes — step by step, in plain language — so you know what to expect, what to demand from any contractor you hire, and how to recognize when corners are being cut.
Because in this industry, corners get cut constantly. And the homeowner almost never knows until the mold comes back.

The professional mold remediation process — all 9 steps
| Step | Action | What It Involves | Skipped by Unqualified Contractors? |
|---|---|---|---|
| 1 | Remove personal contents | All furniture, belongings, and stored items cleared from the containment zone before any work begins. Clean, unobstructed workspace is the foundation of everything that follows. | Sometimes |
| 2 | Set up airtight containment | Plastic sheeting sealed at every penetration point — vents, outlets, doorways, seams. Thickness in millimeters and total quantity documented. Tier determined by mold type and occupant risk. | Very often — most common failure |
| 3 | Establish negative air pressure & egress | Negative air machines create inward airflow — spores cannot escape the containment zone. Egress directs contaminated air safely outside through HEPA filtration. Must be verified before work begins. | Almost always skipped |
| 4 | Identify moisture source | Floodlights, moisture meters, and probes locate the exact water origin. No remediation is effective without resolving the source. This is where experience matters most. | Frequently missed |
| 5 | Remove all porous contaminated material | Drywall, insulation, carpet, saturated wood — anything porous that absorbed moisture is removed and disposed of. Starts from moisture source, follows water migration path outward. | Often treated instead of removed |
| 6 | Wire brush structural members | Studs, joists, and beams that remain are wire brushed to remove all surface mold. Air scrubbers run at full capacity throughout to capture released spores in real time. | Routinely skipped |
| 7 | Execute the sandwich process | Five-layer cleaning sequence: damp wipe → disinfect → HEPA vacuum → damp wipe → disinfect. Applied to every surface inside the containment zone. Non-negotiable — no shortcuts. | Replaced by a single wipe-and-spray |
| 8 | Post-remediation assessment & documentation | Full written report of every step performed, products used, moisture readings before and after, materials removed. Before and after photographs provided to homeowner. | Rarely provided |
| 9 | Independent clearance testing | Air quality test by a separate licensed inspector confirms spore counts meet professional standards. Must be performed by someone other than the remediation contractor to avoid conflict of interest. | Almost never recommended |
Step One: Removing Personal Contents From the Work Area
Before a single tool is unpacked or a single piece of plastic is hung, the first thing a qualified mold remediation team does is remove personal contents from the containment area.
This means furniture, clothing, stored items, electronics — anything in the space that could be contaminated during the remediation process or that could obstruct the work. Items that can be salvaged are carefully removed and, where necessary, cleaned or treated separately. Items that are porous and heavily contaminated may need to be disposed of entirely.
A clean work zone is not optional. It is the foundation everything else is built on.
Step Two: Setting Up Professional Containment
This is the step that separates licensed professionals from unqualified contractors — and it is the step most often skipped, poorly executed, or simply ignored entirely.
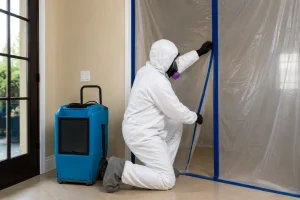
Containment is the process of physically sealing off the work area from the rest of your home using plastic sheeting, sealed barriers, and specialized equipment. The purpose is to prevent mold spores from becoming airborne during the remediation process and spreading to unaffected areas of the building.
When mold-affected materials are disturbed — cut, torn out, wire brushed, or vacuumed — they release millions of microscopic spores into the air. Without proper containment, those spores travel through your HVAC system, through doorways, through gaps in walls — and they settle in clean areas of your home, creating new mold problems in spaces that were not originally affected.
Why Containment Is the Most Skipped Step in the Industry
An airtight containment is not just plastic draped over a doorway. It requires sealed barriers at every penetration point — every gap, every seam, every electrical outlet, every vent. The plastic sheeting must be the right thickness — typically measured in millimeters — and it must be properly taped and secured at all edges.
A qualified contractor should document: what tier of containment was used, what type of barrier system was installed, the thickness of the plastic in millimeters, and the total amount of material used. If a contractor cannot provide that documentation, the containment was not done to professional standards. You can learn more about what a proper pre-remediation mold assessment looks like at PrimeAire’s Initial Mold Assessment page.

The Three Tiers of Mold Containment — And When Each Is Required
Not every mold situation requires the same level of containment. Professional mold remediation uses a tiered system based on the scope of the mold, the type of mold present, and — critically — who is living in the building.Containment tiers — which one does your job require?
| Tier | Level | When It Is Required | Does Square Footage Drive This Decision? |
|---|---|---|---|
| T1 | Basic containment | Small isolated mold under 5–10 sq ft. Non-toxic mold type confirmed. No vulnerable occupants (infants, elderly, immunocompromised) in the building. | Yes — size matters here |
| T2 | Standard containment | Medium-sized mold in basements, bathrooms, hallways. More robust barrier systems and air management. Moderate contamination — no toxic species, no vulnerable occupants. | Yes — size is a factor |
| T3 | Critical containment | Required regardless of square footage when: • Toxic mold species found — Stachybotrys (black mold) or Alternaria confirmed by inspector • Infants, young children, elderly, or immunocompromised occupants are in the building Full critical barriers, double-layer containment, HEPA negative air machines running continuously. | NO — health risk overrides size |
Negative Air Pressure and Egress: The Step Nobody Talks About
Alongside containment setup, a licensed team installs negative air machines to create negative air pressure inside the work area. These machines pull air out of the contaminated zone and exhaust it through a controlled egress — typically a window, duct, or sealed exhaust point — directed safely outside through a HEPA filter.
This creates a pressure differential where air always flows into the contamination zone from clean areas, never the reverse. Mold spores cannot escape because air is always moving inward.
I have walked into jobs where a general contractor set up plastic sheeting but installed no negative air machines and no egress. The containment looked professional from the outside. But without negative air pressure, every time a worker moved through the barrier, mold spores escaped into the rest of the home. The remediation made the contamination worse, not better.

Identifying the Moisture Source Inside the Containment Zone
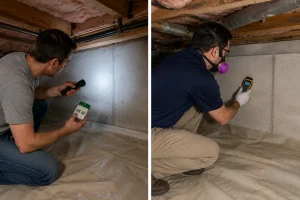
Once containment is fully established and negative air pressure is confirmed, the team begins systematic identification of the moisture source. This requires floodlights to illuminate hidden areas, professional moisture meters to measure moisture content of building materials, and probes to test inside wall cavities and behind surfaces.
Finding the exact source is non-negotiable. No remediation is complete or effective if the moisture source has not been identified and addressed. Removing mold without resolving the water source is the single most reliable way to guarantee that the mold returns. To understand how mold hides and spreads through a building before remediation begins, visit our Hidden Mold resource page — it explains exactly where moisture-driven mold conceals itself in NYC buildings.
What Gets Removed vs. What Gets Treated in Place
The Porous Material Rule
Anything porous that has been touched by liquid water or absorbed moisture gets removed. This is not a judgment call — it is a professional standard. Drywall, insulation, carpet, subflooring, saturated wood framing — if it absorbed moisture and mold has penetrated the material, it comes out.
The reason: mold grows inside porous materials, not just on the surface. Treating the surface of contaminated drywall does not address the mold that has grown into the paper backing and gypsum core. The material must be removed and properly disposed of. Removal always starts from the moisture source and works outward, following the water migration path.
Wire Brushing Structural Members
Not everything can or should be removed. Structural wood members — studs, joists, beams — that show surface mold growth but have not been structurally compromised are wire brushed aggressively to remove all visible mold from the surface. This is done while air scrubbers are running at full capacity to capture the spores released during the brushing process.

The Sandwich Process: The Heart of Professional Mold Remediation
After physical removal and wire brushing, the remediation moves into the sandwich process — a layered, multi-stage cleaning and treatment sequence that ensures no viable mold remains. This is the step that most clearly separates a licensed professional from a general contractor doing surface cleanup.The sandwich process — 5 layers applied to every surface
| Layer | Action | What It Does | Why It Cannot Be Skipped |
|---|---|---|---|
| ① | Damp wipe | All surfaces damp wiped to remove loose mold spores, dust, and debris that settled during removal and wire brushing. | Spraying disinfectant on dusty surfaces is less effective — the physical wipe clears the path for the next step. |
| ② | Disinfect | EPA-registered antimicrobial applied to all surfaces — structural members, concrete, remaining materials — to kill mold at the cellular level. | Chemical kill step. Eliminates viable mold on contact across all treated surfaces. |
| ③ | HEPA vacuum | Professional HEPA vacuum used on all surfaces to capture remaining spores down to 0.3 microns — far smaller than what standard vacuums capture. | Mold spores are microscopic. Only HEPA filtration captures them reliably. Regular vacuums spread spores, not capture them. |
| ④ | Damp wipe again | Second round of damp wiping removes anything disturbed or displaced by the HEPA vacuuming process. | Vacuuming disturbs settled material. The second wipe ensures nothing is left on treated surfaces. |
| ⑤ | Disinfect again | Final application of EPA-registered antimicrobial across all surfaces. Kills anything that survived the first application or was disturbed in subsequent steps. | The final kill step. After this, no viable mold should remain on any treated surface in the containment zone. |
Air Scrubbers and HEPA Filtration: Running Throughout the Entire Process
Air scrubbers equipped with HEPA filtration run from the moment containment is established until the moment it is torn down. They run continuously throughout every stage — not just during removal. Their job is to continuously filter the air inside the containment zone, capturing airborne mold spores before they can settle on clean surfaces.
By the time the remediation is complete, the air quality inside the formerly contaminated space should be measurably cleaner than when the job began.
Post-Remediation Assessment and Documentation: What You Should Receive
When the remediation is complete, a thorough post-remediation assessment is performed and documented. A professional report includes a detailed written record of every step performed: the containment tier used, barrier system installed, moisture readings before and after, materials removed and quantities disposed of, products applied and their EPA registration numbers, and the results of the post-remediation visual inspection.
Before and after photographs are provided documenting the condition of the space at the start and completion of the job. This documentation is essential if you ever need to demonstrate to a home insurance company, a future buyer, or a landlord that professional remediation was performed to industry standards.
If a contractor finishes a job and hands you nothing but a verbal “all done,” that is a serious red flag.

Clearance Testing: Why It Must Be Done After Remediation
Clearance testing is an independent air quality test performed after the remediation is complete to verify that mold has been successfully removed and airborne spore counts are within acceptable levels.
This testing should always be performed after a professional remediation — and always by someone other than the contractor who did the remediation work. A contractor testing their own work has an inherent conflict of interest. Independent clearance testing by a separate licensed mold inspector provides objective, third-party confirmation that the job was done correctly.
PrimeAire Mold Inspections provides independent post-remediation testing and inspections that give homeowners documented proof that their air quality meets professional standards. Learn more about our mold assessment and post-remediation inspection services here.
How Long Does Mold Remediation Take?
One of the most common questions I get before a job starts is how long it will take. The answer depends on the scope of the contamination, the type of mold, and the complexity of the building.Typical mold remediation timelines — New York City
| Job Size | Typical Examples | Timeline | What Affects Duration |
|---|---|---|---|
| Small | Isolated bathroom mold, small wall section, single room corner | 1–3 days | Containment setup, mold type, material removal scope |
| Medium | Basement mold, multiple rooms, hallway and adjacent spaces | 2–5 days | Extent of moisture migration, building age, material layers |
| Large | Attic mold on sheathing, multi-room spread, structural member involvement | 1 week+ | Structural complexity, mold species, NYC building type |
| ⚠️ Red Flag: “Same day” remediation for significant mold | Impossible | The full professional process — containment, removal, sandwich, documentation — cannot be completed in hours for any real mold problem. Walk away. | |
What Unqualified Contractors Skip — And Why It Costs You
Red flags — what to ask before you hire anyone
| What Gets Skipped | What Happens as a Result |
|---|---|
| ✕ No egress or negative air pressure | Mold spores escape the containment zone every time a worker passes through, spreading contamination to previously clean areas of the home. |
| ✕ Containment not airtight or not installed | The entire remediation happens in an open environment. Spores travel freely through the HVAC system and to every room in the building. |
| ✕ No moisture meter used to find source | Moisture source is never identified. The mold is removed from the surface but the water keeps feeding it. It returns — often worse than before — within weeks. |
| ✕ Porous materials treated, not removed | Mold inside drywall, insulation, and wood is not accessible from the surface. Treating the outside leaves the internal mold colony fully intact and actively growing. |
| ✕ Single wipe-and-spray instead of sandwich | Viable mold spores survive on surfaces and in the air. The space looks clean but active mold contamination remains. The problem returns. |
| ✕ No documentation or photos provided | No proof that any professional work was done. Useless for insurance claims, real estate transactions, or legal purposes. No baseline if the mold returns. |
| ✕ Clearance testing not mentioned | No independent verification that the remediation succeeded. The homeowner has no objective proof the air quality is safe — only the contractor’s word. |
| ✕ Significant job completed same day | Physically impossible to complete the full professional process in hours. Any contractor claiming same-day remediation for real mold skipped most of the required steps. |
The most important protection you have as a homeowner is knowing what the process is supposed to look like — and asking the right questions before anyone starts work in your home. Every omission in the table above leaves mold behind and guarantees the problem returns bigger and more expensive than before.

Frequently Asked Questions
What is the difference between mold removal and mold remediation?
Mold removal refers to physically removing mold from surfaces. Mold remediation is the complete professional process — including containment, negative air pressure, removal, multi-stage cleaning, treatment, post-assessment, and documentation — that addresses both the mold and the conditions that caused it. Remediation is the comprehensive solution. Removal alone is not.
Does mold remediation include fixing the leak or moisture source?
The mold remediation process identifies the moisture source and the remediation cannot be effective without that source being resolved. However, the actual plumbing repair, roof repair, or structural waterproofing is typically performed by a separate contractor. A licensed mold professional will identify the source and advise on what needs to be fixed before or alongside the remediation.
What is clearance testing and is it required?
Clearance testing is an independent air quality test performed after remediation by a separate licensed mold inspector. It verifies that mold spore counts in the remediated space meet professional standards. It is not legally required in New York State but is strongly recommended by IICRC standards and is the only way to objectively confirm that a remediation was successful.
What tier of containment do I need?
Tier one is for small, isolated, non-toxic situations. Tier two is for medium-sized affected areas. Tier three is required whenever toxic mold species like Stachybotrys or Alternaria are present, or whenever the building is occupied by infants, young children, elderly individuals, or immunocompromised occupants — regardless of square footage.
How do I know if a contractor is doing a proper remediation?
Ask them before they start: What tier of containment will you use? How will you establish negative air pressure and egress? What is your cleaning process after removal? Will you provide post-remediation documentation and photos? Do you recommend independent clearance testing? A qualified, licensed professional will answer every one of those questions with confidence and specificity.
How long does mold remediation take in NYC?
Small jobs typically take one to three days. Medium jobs take two to five days. Larger or more complex jobs can take a week or more. Any contractor claiming to remediate a significant mold problem in a few hours is not performing the full professional process.
What government standards apply to mold remediation in New York?
The U.S. Environmental Protection Agency publishes official mold remediation guidelines at epa.gov/mold. New York City residents can also reference the NYC Department of Health’s official mold guidance at nyc.gov — Mold and Your Health. Both resources support the professional multi-step remediation process described in this article.

This article was written by a licensed mold inspector and IICRC Building Sciences certified professional at Prime Aire Mold Inspections, proudly serving New York City, New Jersey, and Connecticut for over 20 years. For a professional mold assessment or post-remediation inspection, visit us at primeairemoldinspections.com or call 877-307-5166.